NextJS image gallery using AWS S3
A Ghostbyte Story

Big image galleries can be a nightmare to make, they use huge amounts of storage and load slowly. So the challenge was to find a relatively cheap way to store this large amounts of images somewhere, but of course the gallery should still have a very fast load time.
With these prerequesites we decided to give AWS a try. With AWS we would have the possibility for a big storage (S3) for our images, for serverless functions (lambda) to create our thumbnails on the image oupload and for a CDN (CloudFront) to have the images cached.
AWS
Be careful to use the same AWS region in all the next steps.
Simple Storage Service (S3)
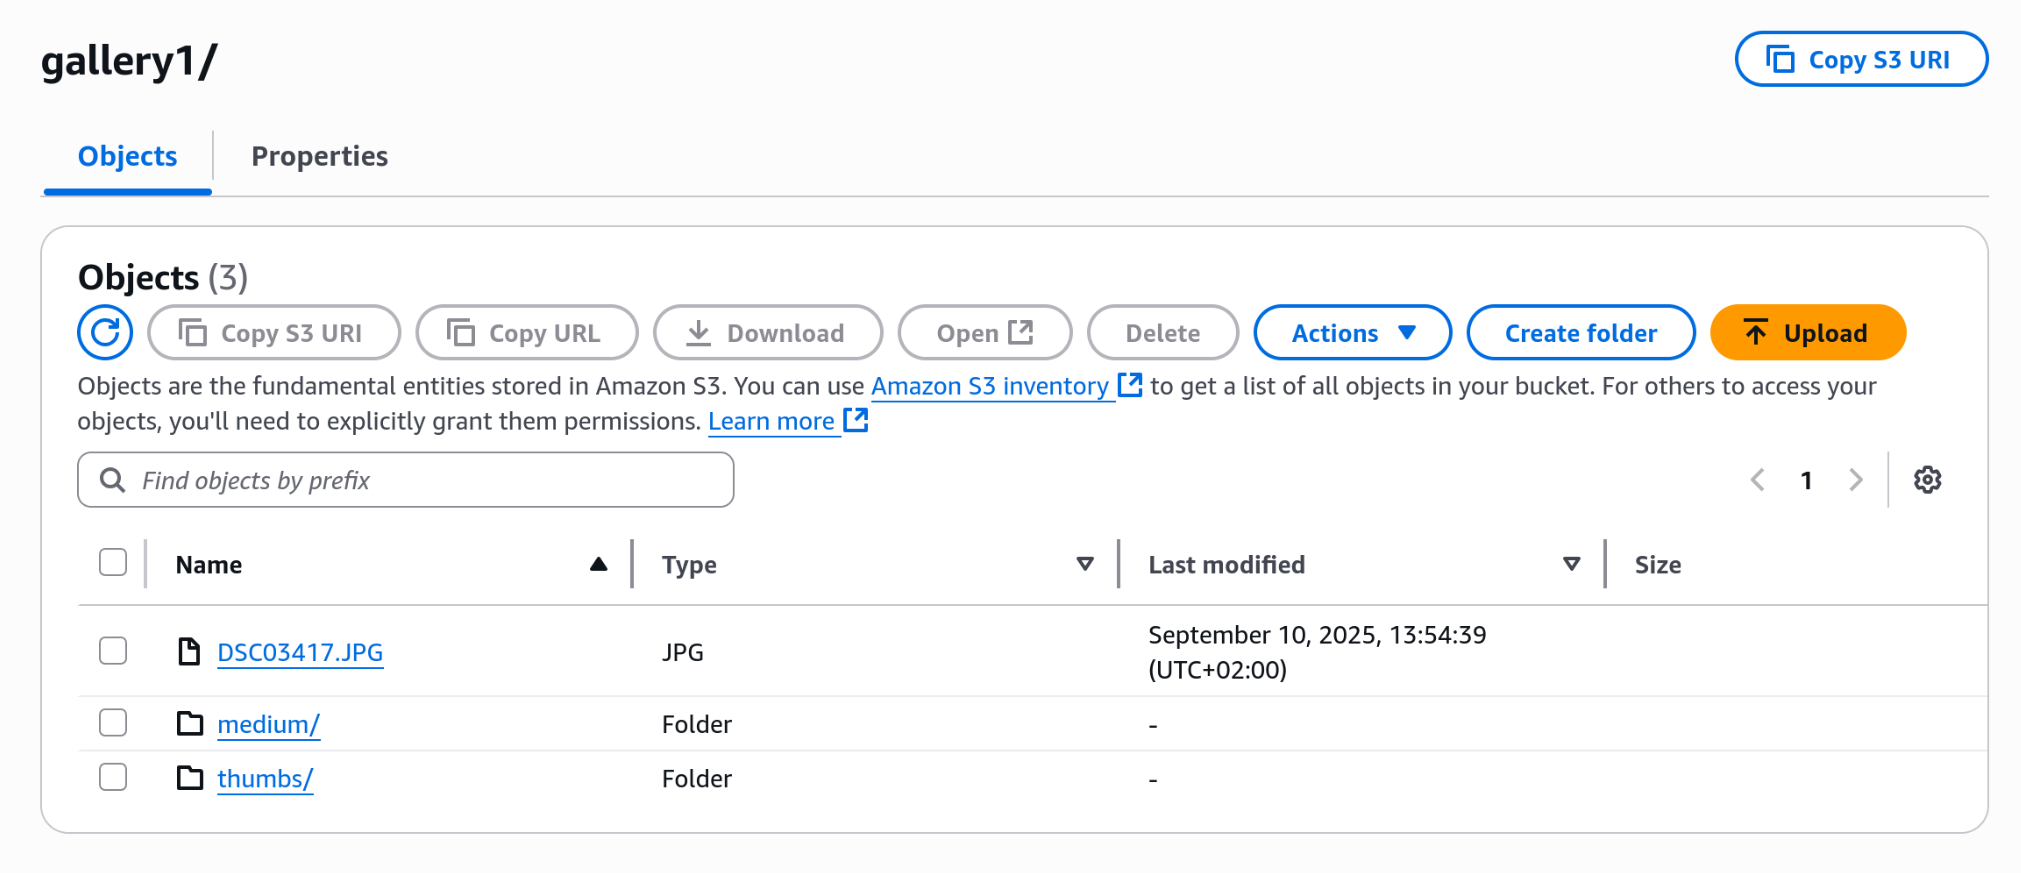
For the image storage we are using a general purpose S3 bucket, where we can create a folder for each image gallery.
- To create the bucket we will open the AWS S3 console.
- Check that General purpose bucket is selected and add a bucket name.
- The other option can be left as is.
Permission policy
For our Lambda function to be able to access the images on the S3 bucket, we need to create a permission policy for it.
- Open the AWS Policies page and click create policy.
- Under policy editor select json and paste the following code:
{
    "Version": "2012-10-17",
    "Statement": [
        {
            "Effect": "Allow",
            "Action": [
                "logs:PutLogEvents",
                "logs:CreateLogGroup",
                "logs:CreateLogStream"
            ],
            "Resource": "arn:aws:logs:*:*:*"
        },
        {
            "Effect": "Allow",
            "Action": [
                "s3:GetObject",
                "s3:PutObject"
            ],
            "Resource": "arn:aws:s3:::*/*"
        }
    ]
}
- Select next.
- Enter a name for our policy.
- Select Create policy.
This allows our Lambda function to get objects from S3 and add new ones there too. It also allows the Lambda function to write to CloudWatch Logs to be able to better debug the function.
Execution role
Since we now have a permission policy, we create a role for our function with the permission set we just created.
- Open the Role page and click create role.
- For trusted entity type select AWS service and for use case select Lambda.
- For the Permission policy, search the permission you created in the previous step and select it.
- Add a name for the Role.
- Create the Role.
AWS Lambda
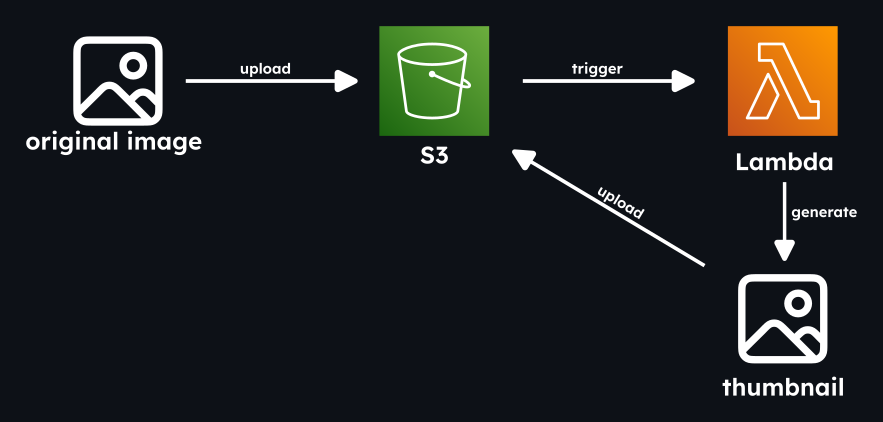
Now that everything is set up, we can get started with the lambda function. This function is called when new images are uploaded to the S3 bucket and generates thumbnails for the uploaded images.
- First open the Function page and select create.
- Select Author from scratch.
- Enter a name for our function.
- Choose the runtime Node.js 22.x.
- Select the Architecture x86.64.
- Under change default execution role:
- Select use an existing role.
- For the existing role search for the previously create execution role.
- Select Create function.
Now that the lambda function is created, we will implement our function locally and then upload it. So since we will use node for our function, lets initialize node.
npm init -y
To process our images and reupload them to the S3 storage, we need to install 2 packages. The image processing package sharp and s3-client to reupload it to S3.
npm install sharp
npm install @aws-sdk/client-s3
For our function we will create a index.mjs file. We use .mjs since we use ES modules. That's all the prerequisites we need, so lets go through the code step by step.
First we will use the handler function, which gets called everytime lambda is invoked.
export const handler = async (event) => {
	await Promise.all(
		event.Records.map(async (record) => {
			const bucket = record.s3.bucket.name;
			const key = decodeURIComponent(record.s3.object.key.replace(/\+/g, " "));

			const response = await client.send(
				new GetObjectCommand({ Bucket: bucket, Key: key })
			);
		});
	)
}
Here we first map through all our records on this event, since we can also upload multiple images to S3 at once. With this record we then get the bucket name and the key of the image and then get the object, which will return a stream of our image.
To be able to process the image further, we first have to convert the image stream to a buffer.
const streamToBuffer = async (stream) => {
	return new Promise((resolve, reject) => {
		const chunks = [];
		stream.on("data", (chunk) => chunks.push(chunk));
		stream.on("end", () => resolve(Buffer.concat(chunks)));
		stream.on("error", reject);
	});
};
Now that we have the image as a buffer, we can use the image processing library sharp to compress our image for a thumbnail.
const thumbnailBuffer = await sharp(inputBuffer)
	.resize({ width: 500})
	.avif()
	.toBuffer();
With our compressed image, all that is now left to do is to upload the thumbnail to the S3 bucket again.
client.send(
	new PutObjectCommand({
		Bucket: bucket,
		Key: thumbKey,
		Body: thumbnailBuffer,
		ContentType: "image/avif",
	})
)
Now as we have all the parts in place here is the whole code for our lambda function where we are creating a thumbnail and a medium sized image for each uploaded image.
import { S3Client, GetObjectCommand, PutObjectCommand } from "@aws-sdk/client-s3";
import sharp from "sharp";
import { Readable } from "stream";

const client = new S3Client();

const streamToBuffer = async (stream) => {
	return new Promise((resolve, reject) => {
		const chunks = [];
		stream.on("data", (chunk) => chunks.push(chunk));
		stream.on("end", () => resolve(Buffer.concat(chunks)));
		stream.on("error", reject);
	});
};

export const handler = async (event, context) => {
	try {
		await Promise.all(
			event.Records.map(async (record) => {
				const bucket = record.s3.bucket.name;
				const key = decodeURIComponent(record.s3.object.key.replace(/\+/g, " "));

				if (key.includes("/thumbs/") || key.includes("medium")) {
					return;
				}

				const response = await client.send(
					new GetObjectCommand({ Bucket: bucket, Key: key })
				);

				const inputBuffer = await streamToBuffer(response.Body);
				const thumbnailBuffer = await sharp(inputBuffer)
					.resize({ width: 500})
					.avif()
					.toBuffer();

				const mediumBuffer = await sharp(inputBuffer)
					.resize({ width: 1300 })
					.avif()
					.toBuffer();

				const lastSlash = key.lastIndexOf("/");

				const folderPath = lastSlash !== -1 ? key.slice(0, lastSlash) : "";

				const filenameWithoutExt = key.slice(lastSlash + 1).replace(/\.[^/.]+$/, ""); // remove any extension

				const thumbKey = `${folderPath}/thumbs/${filenameWithoutExt}.avif`;

				const mediumKey = `${folderPath}/medium/${filenameWithoutExt}.avif`;

				await Promise.all([
					client.send(
						new PutObjectCommand({
							Bucket: bucket,
							Key: thumbKey,
							Body: thumbnailBuffer,
							ContentType: "image/avif",
						})
					),
					client.send(
						new PutObjectCommand({
							Bucket: bucket,
							Key: mediumKey,
							Body: mediumBuffer,
							ContentType: "image/avif",
						})
					)
				]);
			})
		);
		return { statusCode: 200, body: "All thumbnails created" };
		} catch (err) {
			console.error("An error occurred", err);
			throw err;
		}
	};
Now that our function is finished locally, we have to upload it to lambda. To upload it to AWS, we have to compress it to a zip file with the content of our folder at the root. To do this we can run this command inside our project folder.
zip -r lambda-function.zip .
Now in AWS go back to the Lambda function and in the tab Code, select Upload from, select .zip file and upload it. With that the Lambda function is finished.
S3 trigger
Now that we have our Lambda function working, we have to make sure that the function gets called everytime we upload an image to our S3 bucket. For this we are adding a trigger to our function.
- In our Function overview select Add trigger.
- Under source select S3.
- Select our bucket.
- Under event type select All object create events.
- Select the checkbox to accnowledge Recursive invocation.
- Choose Add.
With this set up, we can now try to upload an image to our S3 bucket and check if it automatically generated the compressed images.
CloudFront (CDN)
To further improve the speed of our gallery, a CDN can be added. With the CDN the images are cached on servers close to the clients. Since AWS does provide a CDN (CloudFront), we are using that one
- Go to the CloudFront page.
- Select Create Distribution.
- Enter a name.
- For distribution type select Single website or app.
- Click next.
- For origin type select Amazon S3
- In S3 origin select your S3 Bucket
- For Web Application Firewall (WAF) select Do not enable security protections
- Click next
- Click Create distribution
Now in our Distribution we can see the Distribution domain name, which we will need later on.
Now with this we are able to a access the images on S3 via the domain of the CloudFront distribution.
Before the url to a S3 image looked something like this
https://bucket-name.s3.region.amazonaws.com//gallery1/image.JPG
Now with the CDN it will look something like this.
https://abcdefg.cloudfront.net/gallery1/DSC03417.JPG
Frontend
In the frontend we used NextJS, but any other framework will do the job just as fine. Since the images don't change to often in our galleries, in order to improve performance, we decided to fetch all image URLs from S3 and store them in a json list on build. This keeps the number of fetches to AWS low (cheaper and better performance).
To implement this we have to create a script which will run on build and saves all the image keys in a json file.
But for this to work, we need to create a user that has the permission to fetch data from our S3 bucket.
- To create this user we will firstly navigate to the Identity and Access Management.
- Click Create user.
- Enter a name for our user.
- Select next.
- For permission options select Attach policies directly.
- Attach the policy AmazonS3ReadOnlyAccess.
- Select next.
- Select Create user.
Now we have created a user with which we can read data from our S3 bucket on our client. But for this to work we need to create a access key for this user.
- Click on the newly created user.
- Select Security credentials.
- Click Create access key.
- Select Application running outside AWS.
- Select Next.
- Optionally add a description and click Create access key.
Now that we have our access key, we have to create a .env file and add our Access key and our Secret access key. We can also add our S3 bucket name to the env file and our AWS region where we created our bucket.
AWS_ACCESS_KEY_ID=ABCDEFGHIJKLMNOPQRSTUVWXYZ
AWS_SECRET_ACCESS_KEY=*********************************
AWS_REGION=eu-central-1
AWS_BUCKET_NAME=bucket_name
AWS_CLOUDFRONT_DOMAIN=abcdefghijklmnop.cloudfront.net
Build script
Now that we have all prerequisites set up we can get started with our code to fetch all image keys from AWS. For this I again explain the code in small parts.
First we will have to get all the folders in our S3 bucket.
const command = new ListObjectsV2Command({
	Bucket: process.env.AWS_BUCKET_NAME!,
	Delimiter: "/", // returns "folders" in CommonPrefixes
});

const response = await s3.send(command);

const folders = response.CommonPrefixes?.map((p) => p.Prefix?.replace(/\/$/, "")!) ?? [];
Now that we have all the folders, which will be our galleries, we have to get the image urls for our galleries.
const command = new ListObjectsV2Command({
	Bucket: process.env.AWS_BUCKET_NAME!,
	Prefix: `${folder}/`,
});

const response = await s3.send(command);
With this command we are getting all the file names of a folder.
In the next step we create an image object for each image. This object will include the URL to the original image, the URL to the medium sized image and to the thumbnail.
response.Contents?.filter(
	(item) =>
		item.Key &&
		!item.Key.endsWith("/") &&
		!item.Key.includes("/thumbs/") &&
		!item.Key.includes("/medium"),
).map((item, index) => {
	const fullKey = item.Key!;
	const filename = fullKey.split("/").pop();
	const thumbKey = `${folder}/thumbs/${filename?.replace(/\.[^/.]+$/, ".avif")}`;
	const mediumKey = `${folder}/medium/${filename?.replace(/\.[^/.]+$/, ".avif")}`;
	return {
		url: `https://${process.env.MY_AWS_CLOUDFRONT_DOMAIN}/${fullKey}`,
		thumbUrl: `https://${process.env.MY_AWS_CLOUDFRONT_DOMAIN}/${thumbKey}`,
		mediumUrl: `https://${process.env.MY_AWS_CLOUDFRONT_DOMAIN}/${mediumKey}`,
		key: filename!,
		id: index,
	};
}) ?? []
Now that we have our image objects all that is left is to save them in to a JSON file.
const outputPath = path.join(process.cwd(), "public", "galleries.json");
fs.writeFileSync(outputPath, JSON.stringify(result, null, 2));
This are all the parts needed to create our build method to save our galleries in to a JSON file. Here is the whole code.
import { S3, ListObjectsV2Command } from "@aws-sdk/client-s3";
import "dotenv/config";
import path from "path";
import fs from "fs";

const s3 = new S3({
	credentials: {
		accessKeyId: process.env.AWS_ACCESS_KEY_ID!,
		secretAccessKey: process.env.AWS_SECRET_ACCESS_KEY!,
	},
	region: process.env.AWS_REGION,
});

interface AwsImage {
	thumbUrl: string;
	mediumUrl: string;
	url: string;
	key: string;
	id: number;
}

async function listImages(folder: string): Promise<AwsImage[]> {
	const command = new ListObjectsV2Command({
		Bucket: process.env.AWS_BUCKET_NAME!,
		Prefix: `${folder}/`,
	});

	const response = await s3.send(command);

	return (
		response.Contents?.filter(
			(item) =>
				item.Key &&
				!item.Key.endsWith("/") &&
				!item.Key.includes("/thumbs/") &&
				!item.Key.includes("/medium"),
		).map((item, index) => {
			const fullKey = item.Key!;
			const filename = fullKey.split("/").pop();
			const thumbKey = `${folder}/thumbs/${filename?.replace(/\.[^/.]+$/, ".avif")}`;
			const mediumKey = `${folder}/medium/${filename?.replace(/\.[^/.]+$/, ".avif")}`;
			return {
				url: `https://${process.env.MY_AWS_CLOUDFRONT_DOMAIN}/${fullKey}`,
				thumbUrl: `https://${process.env.MY_AWS_CLOUDFRONT_DOMAIN}/${thumbKey}`,
				mediumUrl: `https://${process.env.MY_AWS_CLOUDFRONT_DOMAIN}/${mediumKey}`,
				key: filename!,
				id: index,
			};
		}) ?? []
	);
}

async function listFolders(): Promise<string[]> {
	const command = new ListObjectsV2Command({
		Bucket: process.env.AWS_BUCKET_NAME!,
		Delimiter: "/", // returns "folders" in CommonPrefixes
	});

	const response = await s3.send(command);
	return (
		response.CommonPrefixes?.map((p) => p.Prefix?.replace(/\/$/, "")!) ?? []
	);
}

async function main() {
	const folders = await listFolders();
	const result: Record<string, AwsImage[]> = {};

	for (const folder of folders) {
		result[folder] = await listImages(folder);
	}

	const outputPath = path.join(process.cwd(), "public", "galleries.json");
	fs.writeFileSync(outputPath, JSON.stringify(result, null, 2));
}

main().catch(console.error);
Now we have to run this script on build, so we have to add a the following scripts to our package.json file.
"scripts": {
	"build": "npm run generate && next build",
	"generate": "node --loader ts-node/esm lib/generateGalleryJson.ts"
},
So now with this all in place, everytime the project is built, a new JSON file will be created.
Displaying the images
To display the images in our nextjs project, we will have to create a function which gets all the image objects from a gallery.
"use server";

import galleries from "@/public/galleries.json";

export interface AwsImage {
	thumbUrl: string;
	mediumUrl: string;
	url: string;
	key: string;
	id: number;
}

export async function listImages(gallery: string): Promise<AwsImage[]> {
	return galleries[gallery];
}
Here we first import the previously created galleries.json file. Then we are defining a interface for a image object. In the listImages function we will then return all images in a specific gallery.
Now to display here is a simple example on how do display those images.
"use server";

import { AwsImage, listImages } from "@/lib/images";
import Image from "next/image";

export default async function Gallery() {
    const images = await listImages("gallery1");
    return (
        <div>
            {images.map((image: AwsImage) => (
                <Image
                    key={image.id}
                    height={100}
                    width={100}
                    src={image.thumbUrl}
                    alt="image"
                />
            ))}
        </div>
    );
}
Since we use a server component here, we can just call the listImages function and get all the image objects. Then we just map through those images and show the thumbUrl.